POLYCARBONATE GREENHOUSE
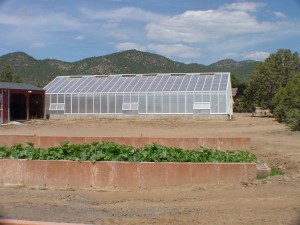
During the early months of summer in 2012 we had the good fortune of building a 27 x 51 polycarbonate greenhouse.
In the beginning we had a good idea of what we needed to do first. Building a large aluminum framed greenhouse is a good challenge. Even for the most experienced tradesman, who have built greenhouse structures before.

An engineered foundation is required in most areas. Doing it right the first time is a wise choice. In the long run its much cheaper than taking short cuts.
Mapping out the footprint with string and markers allows us to perfectly square the foundation footprint.
Once that was established we then began to excavate, carefully digging along the marked outline so as to keep the foundation trench as square as possible.
Keeping in mind, while digging the trench, it must be wide enough to allow for form work. There’s nothing more frustrating and time consuming than having to deal with tight trench locations when setting up forms and working with steel.
Once the form work was completed which took about 2 days with 6 workers. We then began the pour. A formed stem wall trench this size took about 16 yards of concrete. At an average cost of $ 125.00 per yard. Thats about $2,000.00 plus pumper cost and plus labor…
There was no spread footer required, just a 30-36″ below grade stem wall. The next day the forms were stripped to allow the concrete to cure for a couple of days thereafter.
The result was perfection plus, we were able to keep the forms square within a ¼ of an inch. Not bad over a 51 ft run.
Top of wall was level and now we were ready to build. Now that the foundation was ready, the initial set-up required us to install a 2 x 10 sill plates with custom aluminum flashing on top of foundation perimeter.
This provides for an overhang on the outside perimeter of the concrete with a drip edge, to divert moisture.
We then proceeded to assemble the gable wall members. We then assembled the side wall members. Assembling and installing the heavy weight bearing trusses into place. And installing all of the cross members to tie the trusses and gable walls together.
This task took 2 experienced persons about 8-9 working days. Once the frame was up and secure, we check to see that our structure is still true to square and plum.
If you don’t do this step it becomes difficult to install all of the precut polycarbonate panels, since they are precut. There is little room for error. Installing the polycarbonate panels lasted another 10 -12 days. Polycarbonate panels have to be taped and sealed on each end.
We also assembled, and caulked all of the polycarbonate ridge vents. In total 12 units, and all of the solar operated windows, 6 in total. Very time consuming. The overall time to build this project to completion took about 5 weeks plus…
IS POLYCARBONATE GOOD FOR GREENHOUSES OR IS GLASS BETTER….?
You may be wondering about this, so let’s discuss.
Roof and side walls for this project, 16mm (5/8″ overall thickness) – 5 wall clear polycarbonate. Polycarbonate panels are very suitable for light. This allows 67% light transmission. A tough rigid panel with 5 air spaces sandwiched in between. Allowing for greater heat retention during the colder months. Much more effective than double pane glass.
Furthermore glass greenhouses get very hot due to intense sunlight transmission, requiring shading tarps for regions with intense sunlight.
Polycarbonate manufactures offer warranties. 10 year time frame against any breakage due to hail. Hail will bounce off these panels before it penetrates and if it does penetrate, mfgr’s warranties should cover these situations.
IMPORTANT NOTE: IF POLYCARBONATE PANELS ARE NOT INSTALLED WITH THE RIGHT SIDE UP AS SPECIFIED…..IT VOIDS ALL WARRANTIES!
Some may provide free installation and free delivery during the warranty period and others may charge.
Every scenario is different. Warranted polycarbonate panels are free of charge, if breakage caused by hail is within the warranty period.
Overhead tempered or laminated glass generally does not carry any warranties.
POLYCARBONATE GREENHOUSE VENTILATION

as you can see, this is the most critical detail for any greenhouse. Overhead ridge vents, cross ventilation with operable windows, and a forced air fan with auto air intake louvers circulate air whenever needed.
Overhead polycarbonate framed ridge vents are extremely important since hot air rises. There must be a way for hot air to escape. Thermostatically operated actuators or solar powered vent openers are necessary components.
In this particular project the solar powered option was the way to go… highly effective. Very long lasting operation, way less expensive than power and relatively simple maintenance.
CAULKING YOUR CROSS COUNTRY GREENHOUSE
always remember this, key areas for caulking…
Polycarbonate greenhouses are not fish tanks.
It’s important to caulk wherever you think moisture may infiltrate. Areas such as ridge vent edges, eave connections, sill plate connections, fan applications, intake louver applications, entry doors and window edges. These are areas where moisture can penetrate.
After assembling and even while your assembling, take the time to caulk with the correct caulking. Silicone clear caulk, the preferred product. Long after the assembly, silicone’s flexible qualities wont dry and cake up.
GROW YOUR VEGGIES AND HERBS THE RIGHT WAY
Now that we’ve accomplished what we set out to do, you can begin to start growing in your polycarbonate greenhouse.
Many greenhouses, that we generally build, have dirt floors. This way you can use the ground for growing and / or design in-ground planting beds with 2 x10 wood border frames. Better yet, use decorative stone block or plain cement block walls to compartmentalize your growing sections.
Whats nice about growing in the ground, the dirt retains moisture much better than raised beds and easier to maintain. Easy to add and top off with new enriched dirt with every changing season. Easy watering and you don’t have to worry about drainage.
With raised beds, the dirt dries out very quickly and you do have to change most of the dirt way more often than what you may think.
I’ve seen dried up dirt become pulverized dust within one season. Old dirt has no growing value whatsoever not to mention, unnecessary hard work and more expensive to build.
Been there, done that!
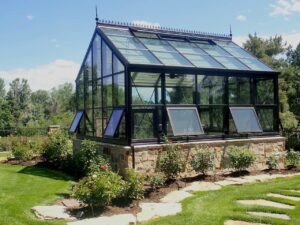
Ultimately it’s your choice. A polycarbonate Greenhouse is by far the best residential backyard Greenhouse money can buy.


